Salesforce CPQ QLE customization with CSS using themes
Ever wanted to use a specific color scheme or CSS rules within Salesforce CPQ QLE (Quote Line Editor)? Look no further and we’ll explain a trick to make the experience better for end users.


Understanding CPQ Themes
Before we start, let’s quickly talk about CPQ Themes, CPQ themes are standard (deprecated) functionality you can use to customize your CPQ experience.
Standard themes, provide some basic customization options but they often fall short of meeting the unqiue branding and style requirements for different businesses.
The current theme situation
As of now, themes are somewhat of a hidden feature, this is due to the fact that they’re hidden inside the Salesforce Classic UI.
Officially they are also unsupported, however this doesn’t stop us from using them and implementing our custom CSS.
Initial setup
- Switch to Salesforce Classic, themes use classic Salesforce Documents to save their styling.
-
Go to all tabs by clicking the ‘+’ icon and search for Themes.

-
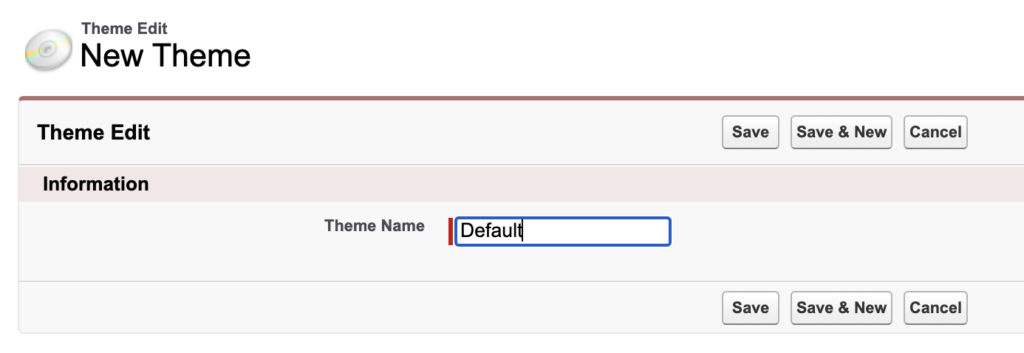
Create a new Theme, in this example we call it ‘Default’
-
Edit the theme, this will bring us to the CPQ Themes visualforce page, for the purpose of this demo, we will not edit any of the default values. You can just publish the Theme.
-
Next go to Setup > Installed Packages and configure Salesforce CPQ, under ‘Additional Settings’ set the Theme to Default and Save

-
Go to all tabs again and go to ‘Documents’, under ‘My Personal Documents’ you will see two new files “Default.css” and “DefaultUI2.css”, edit the properties of both documents and move them to the folder “Salesforce CPQ Assets”.

-
Next open the `DefaultUI2.css` document and view it, you can copy the contents to your machine, you can save it as `DefaultUI2_modified.css` and format it.
Adding your own custom styling
For this example, we are going to add styling that was never truly supported in CPQ Themes, customizing the look of different levels of quote lines inside of the Quote Line Editor (QLE).
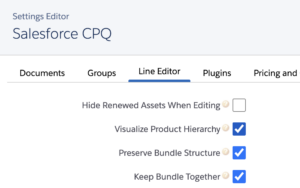
Inside of our “DefaultUI2_modified.css” file, we are going to add styling for the first two levels of quote lines. A requirement for this is having “Visualize Product Hierarchy” checked inside of our QLE package settings. In addition to this, the “SBQQ__ProductName__c” field added to the QLE.
We can do this by adding the following to the end of our “DefaultUI2_modified.css” document;
Next go to your “Default2UI.css” document, click “Replace Document” and replace it with our own “Default2UI_custom.css” document.
We now get the following result when configuring one of our quotes:

Let’s take things a few steps further
We now have a way to style rows inside of the QLE based on their level in the hierarchy, but what if we could conditionally format rows?
To do this, we have to take a few things into account.
-
We can not use our CSS selector based on the contents of a cell
-
Any information we can use to style our rows needs to be present on the QLE
This means we have two options to do this
-
Use a checkbox that we can base a selector on in CSS
-
Use a rich text field, richt text fields are stored as HTML, so they can be used inside of a CSS selector.
In the following example, I have created a new rich text field on quote line called “VariantRT__c”, we can fill in this field on calculation using a Price Rule or using the Quote Calculator Plugin.
To use this field as the base of our conditional formatting, we need to add it to the QLE fieldset we are using.
I have created 3 price rules,one that clears the “VariantRT__c” field on initialization.
One that changes it with the following code when the discount percentage is “100” and it is a bundle product;
And the last one, that changes it with the following code when “SBQQ__NetTotal__c” is equal to 0 and changes our Variant field like this;
What we can then do, is modify our “DefaultUI2_modified.css” file with the following CSS, this colors our entire warning row orange and the 7th column, containing our discount, red:
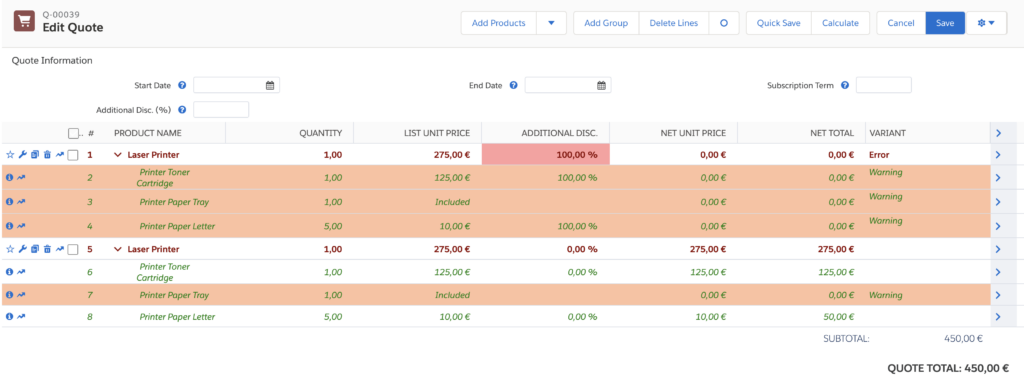
If we re-upload our CSS file and go to our previous quote, duplicate our bundle, change the Discount of the first bundle to 100% and recalculate our quote, we see the following;
Closing Thoughts On Customizing Salesforce CPQ QLE
As is, CPQ Themes are unsupported and rarely used inside of an implementation.
However if we dig deep enough, this is still a valid use case for them.
One thing to take into account however, is that this will not work for everything, modifying the headers of the Quote Line editor for instance, does not work as the CSS is not loaded specifically for the header component.
But with enough tinkering, we can use it as a powerful tool for evolving the Quote Line Editor beyond what we previously thought was possible.
